Showing posts with label Crochet. Show all posts

April 16, 2013

Violet the Dress Up Bunny


Meet Violet. She is a dress up rabbit!
I've had this idea in my mind for quite some time now and after working on her for what feels like forever she's finally complete. I'm so happy with how she turned out!
She's listed in my shop now if you're interested.


June 13, 2012

Home Sweet Home....

So it's finally finished! My very own Home Sweet Home pillow. This pillow was made using the Sweet Home Sweet pattern from Purl Bee. I didn't use the pattern exactly, I really wanted to make this pillow on a budget of less than $20 so I modified the pattern to suite the materials that I found. While I wish I could have used the luxurious Euroflax linen called for in the pattern, I simply can not afford it. I ended up choosing Caron Simply Soft Eco in "natural" which was the only yarn I found that was both similar in color and had that subtle sheen for my teeny tiny budget. This yarn worked nicely, though I do wish I had found something in a smaller weight so I could have used a smaller hook so that my stitches would have been smaller which would have made my letters smaller.


I charted out the words on graph paper. When I was ready to start cross stitching I had to find the center of the fabric. To do that, I folded the fabric in half, folded it in half again and placed a small piece of yarn  in the stitch in the corner to mark the middle of the pillow. I experimented with different strings/yarns for the cross stitching but ended up choosing cotton embroidery thread in red with 2 pieces held together to make it a little bolder.


I sewed it together using a 100% linen fabric for the back that I had already. Somehow during all this the finished pillow ended up being about 2" smaller than it should have been but whatever.. I still like it :)

This was a really fun project and I highly recommend you go and give it a try! I love the whole cross-stitch-on-crochet thing, in fact this project has given me quite a few new ideas using this technique!
Hope you are well! Thanks for stopping by to check out my pillow! <3 Jen

May 16, 2012

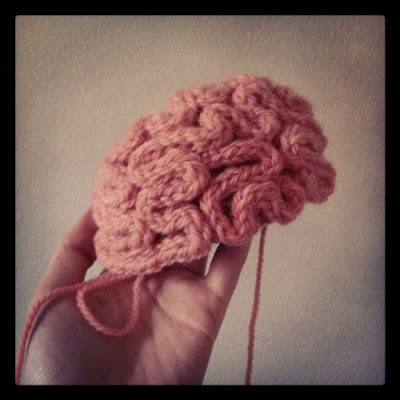
Crocheted Brain

My mom is having brain surgery on Friday and I put together a little get will gift to send to her. When I asked her if she wanted anything specific for mother's day she told me she wanted a new brain. :( So I made her a plush one, I hope it will make her smile.
This will be the second (and hopefully last) surgery she will have to have.

I meant to take pictures of the whole gift but I was in a rush to pack it up and get it to the post office and I forgot to snap a pic of the whole thing put together. But I just put in things to make her laugh/smile and things for her to do while she's in bed getting better and since I'm pretty sure she doesn't read my blog I think it's safe to share...
I was really happy with how this turned out. I tried to find a pattern but couldn't find one that I liked so I just made it up as I went. The only problem that I had is that I accidentally used 2 different dye lots, so the right side is a darker pink than the left side... oh well...
Hope everyone is well. Think a positive thought for my mom on Friday.  <3 Jen

***Update: Mom's surgery went smoothly and she is recovering in record speed***

May 2, 2012

DIY: Doggie Bow Tie - Free Crochet Pattern

Hello! How are you doing today? I hope you are well.
Today I am here to share a quick and easy crochet project to make for your pet!
And as you can clearly see from the above photo, your dog's gonna love it! Haha, Dee really doesn't mind to much when I make her wear stuff, she's a pretty good sport about it at least...

So let's get started! To make this bow tie you will need the following:
- 2 different colored sport weight yarns (I choose yellow and white)
- 4mm crochet hook
- Large needle
- Scissors
- 1 willing pet friend
Bow:
(Using color #1) CH 35, turn
R1 - SC in the 2nd, CH from hook, SC in each CH across (34 SCs), switch to color #2
R2 - CH 1, turn, SC in each SC across (34 SCs)
R3 - CH 1, turn, SC in each SC across (34 SCs), switch to color #1
R4 - CH 1, turn, SC in each SC across (34 SCs)
R5 - CH 1, turn, SC in each SC across (34 SCs), switch to color #2
R6 - CH 1, turn, SC in each SC across (34 SCs)
R7 - CH 1, turn, SC in each SC across (34 SCs), switch to color #1
R8 - CH 1, turn, SC in each SC across (34 SCs), FO, leave a 6 inch tail
- Whip stitch the 2 short sides together to form a circle.
- Weave in and trim any ends.
- Position the seam in the center of the back of the bow, fold the bow in half and using a scrape piece of yarn approx 6" long place a few stitches through the center to give the bow it's shape. (See the top right pic if you need a visual.) This will also help hold it together if your pet decides to scratch at it or tries to shake it off... 
Neck Band:
Using which ever color you like
CH 4, turn
R1 - SC in 2nd CH from hook, SC in each CH across (3 SCs)
R2 - CH 1, turn, SC in each SC across (3 SCs)
R3 - R??  - Repeat R2 until it fits around your pets neck snugly but not tightly, you should be able to easily fit 2 fingers between the band and your pet's neck. When you get it the right length, FO and whip stitch the 2 ends together to form a circle. Weave in and trim ends.
Middle Part:
Using which ever color you like
Leave a 6" tail, CH 6, turn
R1 - SC in 2nd CH from hook, SC in each CH across (5 SCs)
R2 - CH 1, turn, SC in each SC across (5 SCs), FO, leave a 6" tail
Assembly:
- Wrap the middle part around the center of the bow and tie a knot in the back to secure
- Using the tails left over from the middle part, stitch the bow to the band and tie a few knots to secure.
You can make this for any size dog, cat or any other pet that will tolerate a bow. To make a smaller version just start the bow by only CH 25, then make everything else as described. To make a larger bow start by CH 45. And please send me photos of your pets in bows!

I hope you enjoyed this lil DIY, let me know if you have any questions and I'll do my best to help!
Thanks for stopping by! xo Jen and Dee


(Just a note: This is not to be used as a collar, this is just about cuteness. Please always make sure that your pet has a good quality collar and leash to keep them safe and sound when they are out)

As always, this pattern is for personal use only and may not in any way be used for profit. Please feel free to share if you are inclined to do so, but pretty please link back to this post.

April 13, 2012

Lately....

Lately I have been feeling so inspired, I have been making things from sun up to sun down. I just love it when I am in such a creative groove. Nothing feels better to me, nothing makes me happier. Here's just a peak at what I have been up to...
I'm makin a quilt and I use the term 'quilt' very loosely... It's my first and as always I am just diving in head first and hopefully it comes out decent. I plan to share a few posts on how this process has gone for me since this is really my first experience with 'quilting.' I am being pretty ambitious and making a queen size quilt and half way through cutting 250,000 squares (really 240) I thought I was in over my head but every thing's cut and I'm ready to start crazy stitching them together. Wish me luck!
I'm making some serious progress on my sweet home sweet pillow.
Been plush makin' too! I made a little ghost and a rain cloud. These will be up in the shop very soon if you are interested.  

I'm also working on finishing up a cushion for my trash find chair and I am putting together a quick how-to for that, hopefully it will be finished in the next few days.... Annnd I think that's everything that I am working on.
Are you working on anything special lately?

March 29, 2012

Shop Update


Ervin the Black Bird
Hello there! I just added a new plush to my Etsy and thought I would share a few pictures of him here.

Ervin the Black Bird
Up for adoption from The Humble Carnival is Ervin the Black Bird. Ervin is a shy bird for he fears being baked into a pie! He hides under his hat to confuse any potential pie bakers. I guess you could say he's got a bit of a complex...

Ervin the Black Bird

March 13, 2012

Shop Update


This little bear is Lulu. Lulu is a collector of many things.
She is now available in my shop.
I had a lot of fun making her, she made me wish that I had a sweater covered with buttons.
Maybe I will make one? I have seen a few here and there and they always look so darn cute! This could be a great spring project....


 And here's another one of Cecil just cuz.

I will be back tomorrow with my inspiration list! I want to share a little collection of things that I find inspiring and beautiful . It's the first time I will be posting this but I am really excited about it and hope to make it a regular feature on my blog.

March 10, 2012

Bear Brooch - Free Crochet Pattern


Hello! I'm here today to share a free crochet pattern with you! This is a super simple pattern for a cute little bear brooch. To make this you will need to know how to crochet into a ring and how to make a single crochet stitch. That's it! Super simple. To get started you will need a few supplies....
Supplies:

-Brown fingering weight yarn - I used a locally made 100% alpaca yarn
-3.75 mm crochet hook
-Small amount of black yarn or embroidery thread - I used wool yarn
-1 small bow - I buy the ready made kind, you can find these in the ribbon section at most craft stores or could can make your own
-1 1inch brooch back
-2 eyes - I used small black beads but you can use safety eyes, beads or black felt
-Tapestry needle
-Needle and thread
-Stitch markers
-A small amount of fluff - poly fill, yarn scraps, cotton balls...
-A piece of cardboard at least 2"x2" - I cut mine from a cereal box
Instructions

Head (make 2 - a front and a back)
CH 6 into a ring (magic  ring technique)
Rnd 1 - 2SC in each SC around (12sts)
Rnd 2 - *2SC in first SC, SC in next st. Repeat from * around (18sts)
Rnd 3 - *2SC in first SC, SC in next 2 sts. Repeat from * around (24sts)
Rnd 4 - *2SC in first SC, SC in next 3 sts. Repeat from * around (30sts)
Rnd 5 - *2SC in first SC, SC in next 4 sts. Repeat from * around (36sts)
Rnd 6 - *2SC in first SC, SC in next 5 sts. Repeat from * around (42sts)
Slip Stitch to finish off, leave a 12 inch tail and cut yarn.
You only need to leave a 12 inch tail on one of your 2 circles, for the second one just leave a short tail.

Ears (make 2)
CH 6 into a ring (magic ring technique)
Rnd 1 - 2SC in each SC around (12sts)
Rnd 2 - *2SC in first SC, SC in next st. Repeat from * around (18sts)
Slip Stitch to finish off, leave a 12 inch tail and cut yarn.
Fold the circle in half and whip stitch it together. Do not cut left over yarn tail.

Muzzle
CH 6 into a ring (magic ring technique)
Rnd 1 - SC in each SC around (6sts)
Rnd 2 - SC in each SC around (6sts)
Slip Stitch to finish off, leave a 12 inch tail and cut yarn.
Use the black yarn/embroidery thread to stitch on a small black nose, tie a knot to secure it and trim excess.

Assembly
(you can click the photo above to make it larger if you need to)

1. Hold the 2 head circles together, right sides out. Using the 12" tail, whip stitch them together until you have about half stitched up and half open. Then stop whip stitching but do not cut yarn.
2. Now that the head is stitched half way together you can attach the ears. Using the long tail you left on the ear, sew in the seam you created when you stitched the 2 head pieces together. You can position them anywhere you like just leave a 1" space between the ears. Secure them with a knot and trim excess yarn.
3.Next sew on the muzzle, make sure while sewing this part that you only stitch through the front circle.  I didn't stuff mine but you can if you want to. Stitch the muzzle on where ever you think looks best but be sure to keep it centered between the ears. I positioned mine directly in the center of the face. Secure the muzzle with a knot and trim excess yarn.
4. Attach the eyes and sew on the bow.
5. Sew on the brooch back being careful to stitch through the back circle only. Tie a few knots to make sure the brooch back is nice and secure!
6. Now cut a circle from the cardboard just a little smaller than your bear head. The purpose of the cardboard is to help the brooch lie flat on your cardigan (or where ever) when you wear it. Put the cardboard in the bear head, make sure that it is small enough that you can still stitch the head closed if not cut it a little smaller until you get it just right. Now add just a bit of fluff. Make sure to put the fluff in front of the cardboard. Don't over stuff, just add a very small amount to help give the bear a little shape.
Finish whip stitching the head closed until there is no opening. Tie a knot, trim and work away the yarn end.
Yay! Now you're done!


I hoped you enjoyed making this little bear brooch! If you have any questions about it or notice any confusing bits or typos just leave them in the comments section below and I will respond with any help I can offer!

(This is a free pattern and is for personal use only, this pattern is NOT for commercial use. Meaning you are free to make as many as you like, display or share the pattern or finished item as long as you credit me or link back to this post. You may not sell this pattern or finished product made from it)

March 8, 2012

Cecil the Flying Trapeze Rabbit


Cecil
Cecil

Cecil is a flying trapeze artist here at The Humble Carnival.
He loves to impress by soaring effortlessly above the crowd while looking his best in stripes and a bow tie! You can read more about him and see more photos by clicking his name under the picture.


I am finally getting around to posting some of my crocheted plush to my Etsy. This little guy was pretty much my inspiration for starting The Humble Carnival so I thought it fitting to share him first. More members of The Humble Carnival to come very soon!

I am also considering writing a pattern for him so you could make your very own Cecil! Would you be interested in that? If so please let me know!